One box of spice cake mix, and one can of pumpkin.
It is that easy. And no eggs, no oil- so a lighter version.
I also picked up :
these cute fall cupcake liners,
cream cheese frosting,
and a bag of candy corn for decorations.
I also had some sprinkles kicking around the cabinets.
1. Preheat the oven to 350 degrees.
2. Combine one box of cake mix and one can of pumpkin.
Really, it is that easy.
Mix well (it will be thick) and pour into your cupcake liners.
(these liners are awesome and are stiff enough that they don't even require a muffin tin).
3. Make sure you smooth the tops of the batter- they will not "settle" like a normal cupcake, so if you leave them in this blob like form.. they will cook in this blob like form. Just take a spoon and even out the tops of the batter.
4. Bake for 18-22 minutes, or until a toothpick comes out clean.
As you can see- I did not read that tip until after and my cupcakes came out a little blob like- no big deal. Frosting hides everything.
Once these suckers cool, top them with cream cheese frosting (is there anything better?) and then decorate. I topped them with crushed gingerbread cookies, sprinkles, and candy corns.
They may look like a 5 year old decorated them, but I can promise you they tasted delicious (and were so easy!) I doubled the batch and brought them to my night class Thursday and they were a hit. Today I will take the leftovers and give them to the homeless at the park next door. Nice little Halloween treat and lets be honest...
it is very dangerous to have 15 cupcakes sitting around your apartment.
At first, I was really disappointed to see vegetarian options on my "menu" for that weeks Blue Apron. I love a hearty meaty meal and I was a little "eh" about the idea of being satisfied after a vegetarian dinner.
Sorry vegetarians,
but I love me a nice rare steak, or any form of seafood.
Once I accepted that I was going to try some vegetarian dinners, I was a little excited to see that brown box on my door step.
But wait.. Carrots? I am going to make a meal with the main item being... carrots? Alright Blue Apron... impress me. I decided to cook this meal first and embrace something different, and I am so glad I did.
Not only did I LOVE this meal- but I loved all the vegetarian dinners (and yes- you can make a meal based around carrots). This recipe took me out of my "meat and potatoes" comfort zone and taught me some fun new recipes I would have never tried on my own. (who has ever heard of amaranth?)
If you are okay with ditching the meat for a night, then you should try this delicious recipe. And, really...who needs meat when you have pan-fried goat cheese?
Heirloom Carrots & Crispy Goat Cheese
with Toasted Almonds & Frisée Salad
(www.blueapron.com)
"What’s better than fried cheese? Breaded, fried goat cheese! Goat cheese doesn’t melt at high temperatures, making it perfect for this recipe. The toasty crunchiness of these panko-coated goat cheese rounds enriches and complements the natural sweetness of heirloom carrots and slightly bitter frisée. It’s a recipe so good, you might want to pass it on."-- Blue Apron.
The following recipe was taken from the link above -
recipe courtesy of Blue Apron
Ingredients
4 Ounces Goat Cheese
2 Cloves Garlic
1 Bunch Heirloom Carrots
1 Bunch Marjoram
1 Bunch Parsley
1/2 Head Frisée
1 Lemon
1 Shallot
1/4 Cup Almonds
1/4 Cup Amaranth
(If you can't find this- use quinoa or some kind of grain you can find)
3 Tablespoons Vegetable Demi-Glace
2 Tablespoons Butter
1/4 Cup Panko Breadcrumbs
About 675 Calories Per Serving
Makes 2 Servings
INSTRUCTIONS:
1. Prep:
Wash and dry the fresh produce. Heat a small pot of salted water to boiling on high. Heat your knife under hot water, dry it and slice the cheese into 6 discs. Place the discs in the freezer to chill. Peel and mince the garlic and shallot. Trim off and discard the carrot greens. Pick the marjoram and parsley off the stems; discard the stems. Roughly chop the frisee. Using a peeler, remove the rind of the lemon (avoiding the pith) and mince to get 2 teaspoons of zest. Quarter the lemon and remove the seeds. Roughly chop the almonds.
2. Cook the Amaranth:
Once the water is boiling, add the amaranth and cook 20 to 22 minutes, or until tender. Drain thoroughly and set aside while you continue cooking.
3. Start the Carrots:
In a large pan, heat 2 teaspoons of olive oil on medium until hot. Add the garlic and shallot and season with salt and pepper. Cook, stirring frequently, 30 seconds to 1 minute, or until fragrant. Add the carrots, vegetable demi-glace, lemon zest, half the butter and ½ cup of water; season with salt and pepper. Increase the heat to medium-high and bring to a boil, then reduce the heat to medium and loosely cover with aluminum foil. Cook 14 to 16 minutes, or until slightly reduced and the carrots are tender. Remove from heat.
4. Toast the Almonds:
While the carrots cook, heat a small pan on medium-high until hot. Add the almonds and toast, stirring frequently, 2 to 3 minutes or until lightly browned. Transfer the toasted almonds to a small bowl and set aside. Wipe out the pan
5. Goat Cheese:
While the carrots continue to cook, remove the goat cheese from the freezer. Coat both sides of each piece in panko, gently pressing the breadcrumbs into the cheese. In the same pan used to toast the nuts, heat a thin layer of olive oil on medium-high until hot. Once the oil is hot enough that a few breadcrumbs sizzle immediately when added, add the coated discs and cook 30 seconds to 1 minute per side, or until crispy and brown. Transfer the cooked discs to a paper towel-lined plate
6. Plate:
In a large bowl, combine the frisée and parsley. Toss with the juice of 1 lemon wedge and a drizzle of olive oil. Season with salt and pepper to taste. To finish your dish, stir the cooked amaranth, the juice of 1 lemon wedge and the remaining butter into the stewed carrots. To plate your dish, divide the carrots and crispy goat cheese between 2 dishes and garnish with the toasted almonds and marjoram. Serve the frisée salad and remaining lemon wedges on the side.
(All pictures were taken with my Nikon D3100- some were taken with my GoPro and are noted).
Being new to Utah (and a little neurotic) I spent a fair amount of time doing some research before we headed up this mountain. Let's start with some background information acquired from good ole wikipedia.
Mount Timpanogos, Timp according to the locals, is the second highest mountain in the Wasatch mountain range. Timp's elevation is 11,752' above sea level with 5,270' of topographic prominence. (The trail we took, Timpooneke had 4,652' of elevation gain). Timp is the 47th most prominent mountain in the US and it took a little research for me to wrap my mind around the concept of "prominence". According to wikipedia, "In topography, prominencecharacterizes the height of a mountain or hill's summit by the vertical distance between it and the lowest contour line encircling it and no higher summit. It is a measure of the independence of a summit." Basically, Prominence is the peaks "steepness" is what I took away.
The exposed portion of the mountain is made up "entirely oflimestoneanddolomite".The word Timpanogos comes from thetribe who lived in the surrounding valleys. "Timpanogos Glacier is a rock-covered mass found on a long, north-facing slope, and usually has patches of snow the entire year". After my research I found it is common practice to "slide down" this glacier and then be rescued by the emergency services once you have hit a rock on your way down. Timpanogos Emergency Response Team ("TERT") has been established on the mountain on weekends to provide first aid and rescue to those inured on the mountain. The Timp Glacier is one of the major sources of injury or death to hikers on Timp, (when they attempt to "glissade" down the glacier.) While many do it safely, I decided that I was going to take the long (safer) way down.
After doing my research I decided, okay, this seems like a LONG hike but everyone describes it as pretty easy and pleasant. Some sites said it was 12 miles, some said it was 14, I decided I liked 12 better. According to Wikipedia, "Although it is a 14-mile round-trip hike, with almost a mile of elevation gain, Timp's summit is one of the most-visited in the Rocky Mountains. " Okay so this is a popular hike, and should be fairly easy?
I was very, very wrong.
After doing research, I found out there there were two trails to get up to Timp's summit. One, Aspen Grove, was a little shorter, but a little more challenging in the elevation department. The other trail, Timpooneke, started at a higher elevation, had a little less elevation gain, and was a little more dog friendly. We decided to take the Timpooneke trail up to the summit.
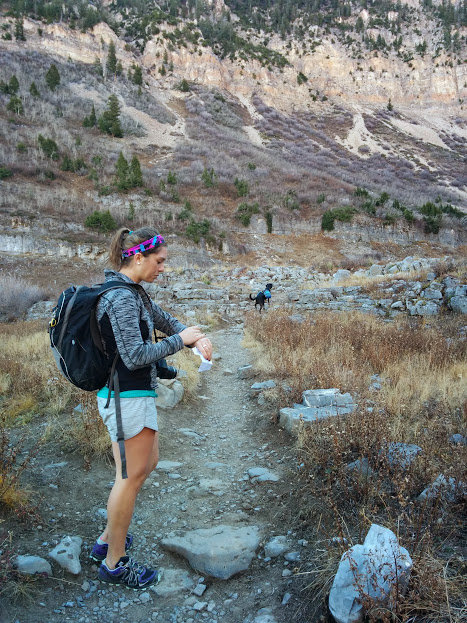
PREPPING: Usually Thatcher takes his big pack, and I take my little running camelbak. We decided to both bring normal sized bag packs as we would need enough water snacks and supplies for the three of us. We brought wraps for lunch, beer for the summit, water for us and the dog, my camera, my zoom lens, my tripod, my GoPro, and a few layers (I had a tank top, thick long sleeve shirt, my Lulu running jacket, pants, gloves, and a head band). We knew it was going to be a windy day, and we knew it was going to be chilly at 11,700'. Olive carried some snacks, a small first aid kit, bug spray, and sun block. We hopped on the highway and headed to the trail head and started our hike at 10am. There was a little congestion in the parking area/entrance because there was a film crew filming a scene for the movie "War Pigs". TRAIL HEAD: Taking 1-15 to Alpine Highland exit- Follow SR-92 to the ranger booth (6$ to get in- 3 day pass). Follow the Alpine Loop until you get to the Timpooneke Campground. Just past the campground you will see a parking lot and the trail head. There is a bathroom here as well at the base.
Like I said, different websites had different numbers for total distance, and different categories of difficulty. I used This Local Hikes Site as an idea and told Thatcher we would be going on a 12 mile hike. He was a little apprehensive, but excited to hike Timp. We were a whole lot LESS excited when we realized the total distance was just shy of 15 miles and would require some rock climbing.
The first 5 miles of the trail was breathtaking. A nice dirt trail, easy incline, waterfalls, bridges, and beautiful trees and vegetation.
About 1.5 miles into the hike, we came across a sign for Scout Falls. A left about 1000 yards takes you to Scout Falls. At the falls there was a gentlemen eating breakfast with a view, He told us he had been out on Timp hiking and camping for the past three days.
We left the falls and went back on the main trail (right) to head to the summit. We had Olive off her leash for about 90% of the hike. She wore her pack which A) makes her help us carry some of the lighter things- clothes and snacks, and B) slows her down and ensures she sticks with us. With her pack on she is quite perfect.
As we made our way along the trail, the views just got more and more amazing. Of course I stopped to take about a million pictures and caught some pretty awesome shots of Timp and the Wasatch forest.
2 miles into the hike you hit the "Giant Stair Case". The elevation increases a little and rocks along the trail resemble a stair case.
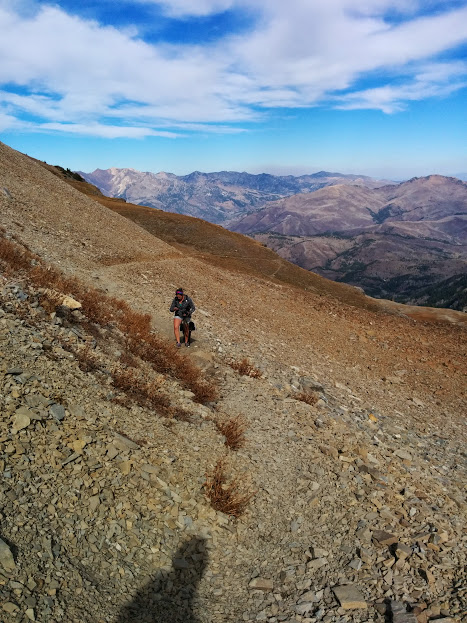
3-4 miles into the trail you are in Talus Field. Here you will see a sign for Emerald Lake- which will not take you to the summit but is a nice shorter easier hike if you don't want to climb the prominence peak. We did not head to Emerald Lake but followed the signs to Timp's Peak. I also put on my layers and was thankful for my hood and gloves!
At this point, you can see Timp's Summit (that pyramid) and it is still quite far away...... A little daunting I will admit. This is a good time to turn around if rock climbing up this peak is not your cup of tea.
That peak is Timp's summit.
(Just before you reach the Emerald Lake split, you will see a sign for a toilet. It is a pile of rocks with a view so if you need some privacy(ish)- there you go)
(That's where we were heading- that point- this is where the hike got harder and harder) You follow a narrow path across that ledge and then scramble up to that peak- up very loose and steep rocks.
GoPro picture - a rest with a not so happy Olive.
GoPro
At 5.5 miles, you hit the 11,000' pass. At this point, Olive came up to the pass, saw the drops to each side, turned around and BOOKED IT. I can't blame her- and being afraid of heights, I considered joining her. It was a terrifying view with a long treacherous hike to the peak. After we caught (and leashed) Olive, we started to make our way to the top. We had made it this far, and as cliche as it sounds... there was no turning back. I was going to sign that book!
(I let Thatcher borrow my stylish purple gloves- he will be bringing more layers next trip)
This was also the point where I put my Nikon in my bag because it was the kind of hike you needed BOTH HANDS, and pay close attention so you don't go tumbling down. Don't worry I had my GoPro clipped on my bag on a lanyard so I could easily take a few pictures. GoPro
Go Pro view of where we had just came from- That teeny trail
I did not read about this tiny ledge, this barely path, and the fact that you would be scaling up the mountain, on the side of a cliff. I really hate heights so I was really proud I was able to keep going. I went slowly, and put one foot in front of the other, staring down at the ground and not at the edge of the cliff. As scary as it was, I felt like we were watching a National Geographic film. These views belonged on Planet Earth, or atleast one of the cool shots on Walter Mitty. These views were terrifying but absolutely amazing and these pictures do not do the views justice. You will just have to hike it yourself!
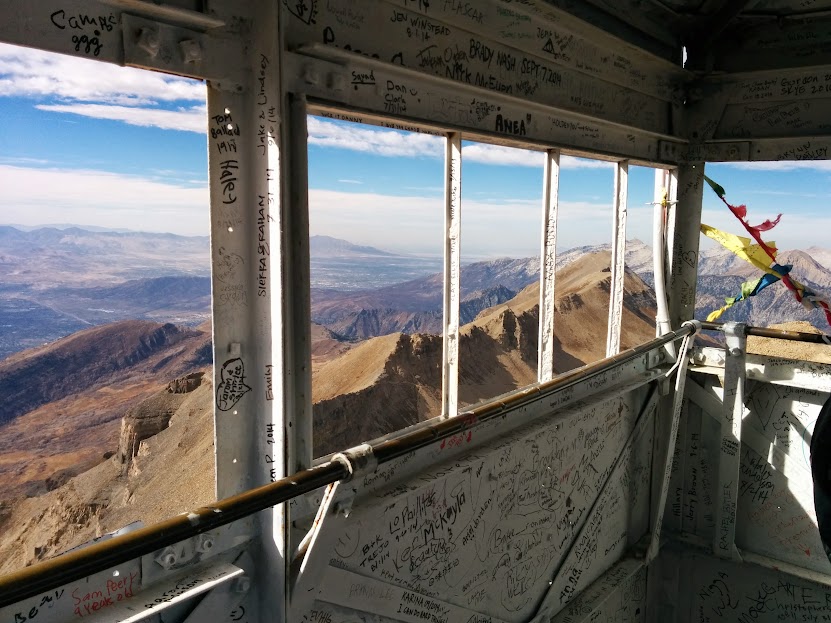
GoPro- Signing the book! Finally, after a pretty scary climb with a ton of elevation, we made it to the top. On the top of the summit is a little guard shack. We sat in the shack for a few minutes and caught our breath (11,700' - hello altitude), and signed the log in book. I was not enjoying the heights, the cold, and the 40mph winds, so we had a quick snack and headed back down to an area where we could enjoy lunch.
GoPro
GoPro
Go Pro
We were both a little sketched out by the ledge, the unsure footing, tumbling rock, and steepness. We were so glad to get off that peak although the hike back down it was even trickier!
Like I said, this hike was 7.5 miles each way. I will say, by mile 9-10, we were exhausted. Achey bodies and head aches set in and even Olive was started to drag a bit. We realized what we thought was going to be 12 miles, was going to be 15 miles. The last few miles of the hike were tough and we booked it down the mountain.
8 hours and 15 miles later, we were back to the car with the most amazing sunset.
And sore legs (and backs, and arms, and everything).
Three tired bodies headed home after a long long day. Looking back, we had a great time and were so glad we did it. We found this hike challenging. As East Coast natives we are NOT used to climbs with this type of elevation. While I am a distance runner, 15 miles up 4,500' is quite challenging. I would do this hike again, but to Emerald Lake instead of heading all the way up to the summit. If you are considering this hike, bite the bullet and do it- but make sure you leave early enough and be prepared for some steep climbs and 15 miles. Also bring a ton of water- we used up all of ours by mile 13.
I am so glad I was able to hike this mountain as it was on my bucket list and has been rated as one of the best hikes in Utah. It was challenging, unexpected, but completely worth it. If you go hike it, be prepared for the long distance, and challenging last bit to the top. This was a humbling experience and a little taste of what King's Peak (highest peak in Utah) will be like next summer.